
- (619) 483-4180
- info@avantiico.com
Product Selection Tools
Evaluation Guides
Readiness Overview
Identifying Stakeholders
Managing Expectations
Prepare to be Prepared
Upgrade Services
Project Management
Roadmap Services
Data Migration
Data & Analytics
Avantiico Industry Solutions
Explore by Business Need
Avantiico Industry Solutions
Microsoft Platforms
Licensing & Pricing Options
Our Partners
Careers
Avantiico Academy Program
About Avantiico
Events & Webinars
Core Services
Core Solution Areas
Recent Blog Posts
Featured Blog Posts

The Microsoft Dynamics AX/D365 Support Team at Avantiico is focused on solving our client’s problems, from daily issues to large and more complex problems.
One of the great new features in Microsoft Dynamics AX 2012 R3 for tracking the procurement of raw materials and inventory is the concept of Loads. Loads are generally created by the procurement department via Purchase Order lines, which give them the ability to track and change dates, shipping identification numbers, and key information during the transit time of the load. Loads also integrate seamlessly with the new advanced warehousing (WMS) functionality in AX 2012 R3, allowing warehouse users to receive shipments against a load using the Warehousing app shipped out of the box with AX 2012 R3 (see: Configuring Functionality for the Microsoft Dynamics AX 2012 R3 Warehouse Mobile Device).
*Please note that loads can also be used for outbound shipments, but I will address them in this blog post from the persona of the load planner from the procurement department. All examples used in this blog post are derived from Microsoft Dynamics AX 2012 R3 Contoso demo data.
You can find Loads in the new Warehouse Management module. See: Warehouse Management -> Common -> Loads -> All loads; reach the Load Planning Workbench from the Ribbon Bar of either a Load or a Purchase Order.
In this example, I will create a single-line PO and add that line to a load. You can do this from Procurement and Sourcing -> Purchase Orders -> All Purchase Orders -> New. Once the PO is created to a warehouse with advanced warehousing turned on, navigate to the Warehouse Management tab on the ribbon bar and click Load Planning Workbench.
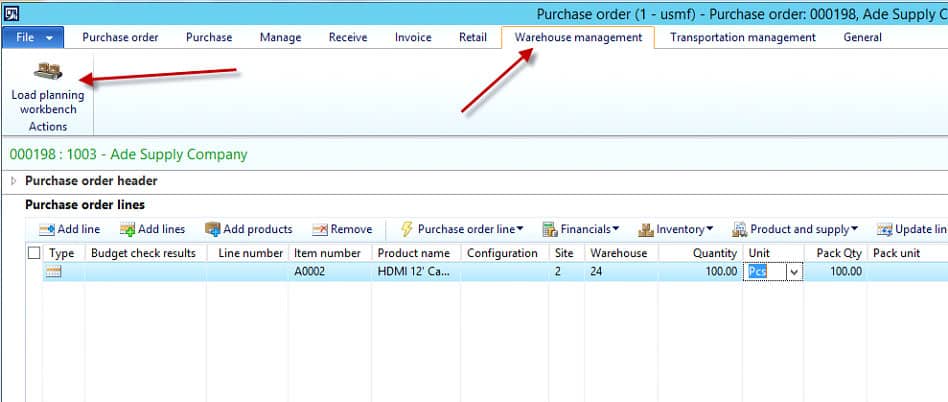
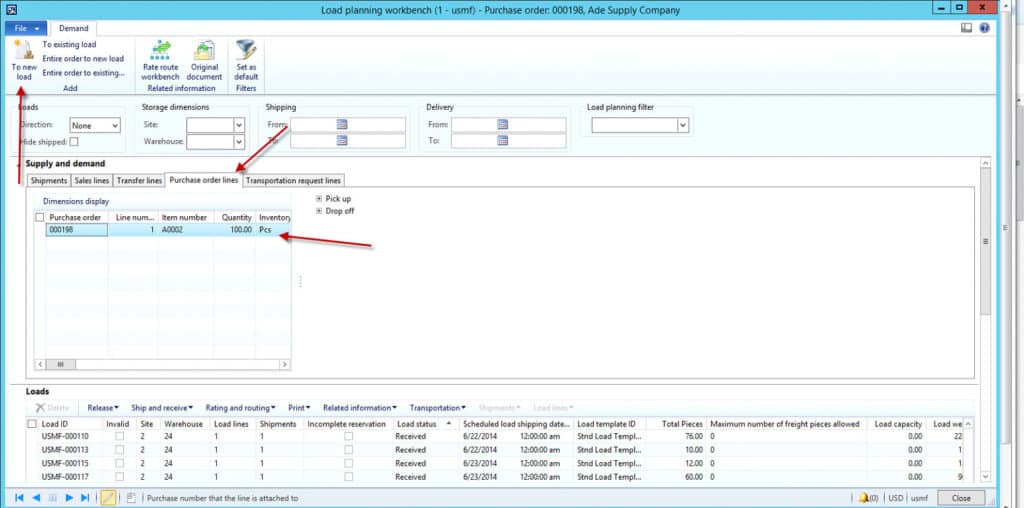
You are now in the Load Planning Workbench. What you will see here is the purchase line you have created on that PO. You can also see the tabs for other types of line items that integrate with loads out of the box: Sales lines, Transfer lines, etc. In this example, we will use this PO line to create a new load. Do this by clicking the PO line from your PO and then in the ribbon bar, [Add] To new load.
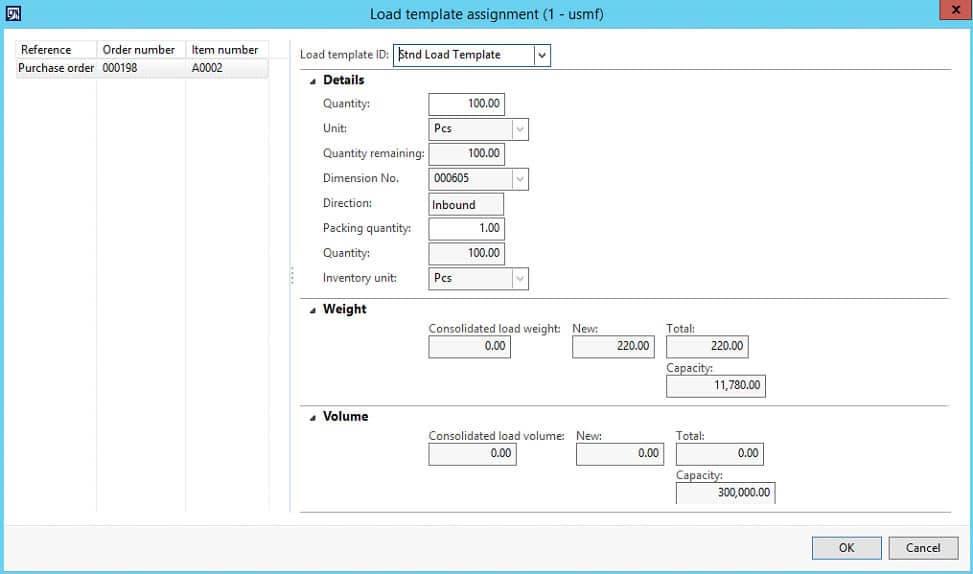
This action will prompt you to assign a Load template. Load templates can be configured at Warehouse Management -> Setup -> Loads -> Load template. The intention is to create a shipping unit that puts an optional limitation on the volume, weight, or quantity of a load. In order for the volume measurement to be done, volume must be set up against the released item. As you can see this Contoso demo item has Weight, but not Volume configured against it. You can also assign equipment to the load template.
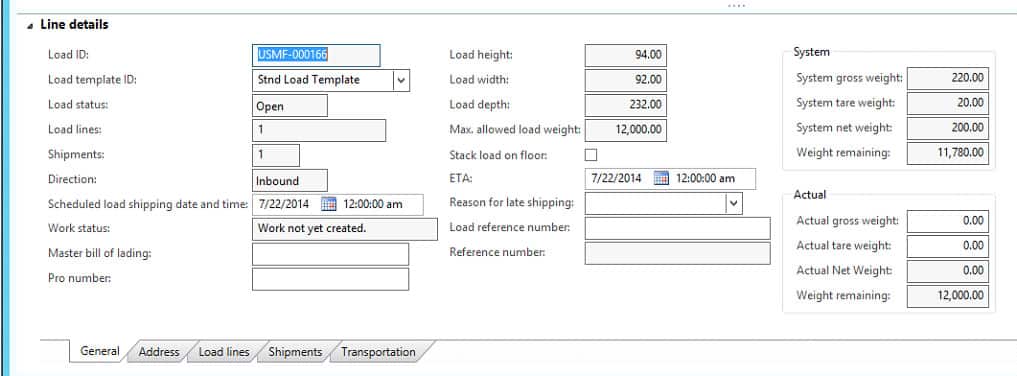
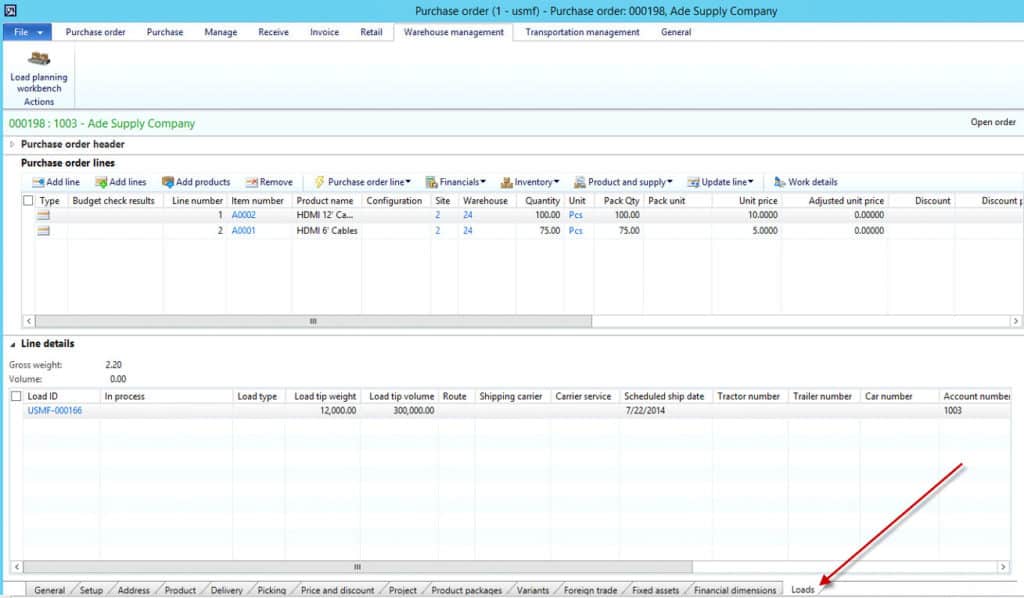
On the Load Planning Workbench there are Line details you can find at the bottom of the screen. This carries a great deal of useful information that ties into WMS and TMS, such as: weight, shipping and ETA dates, reference numbers, statuses, to/from addresses, line details, and rating/routing for TMS that can be applied as landed costs.
If you create a load from a PO but then find you need to add or subtract information from the load, this too is possible. Consider these three scenarios when a load is already en route:
Each of these scenarios can be handled with the Load Planning Workbench. The third line item, decreasing a quantity, happens automatically when a PO line quantity is reduced on a load in progress. The first two, however, need to be added to the load. In this example I am adding a line with a new item to demonstrate the first scenario.
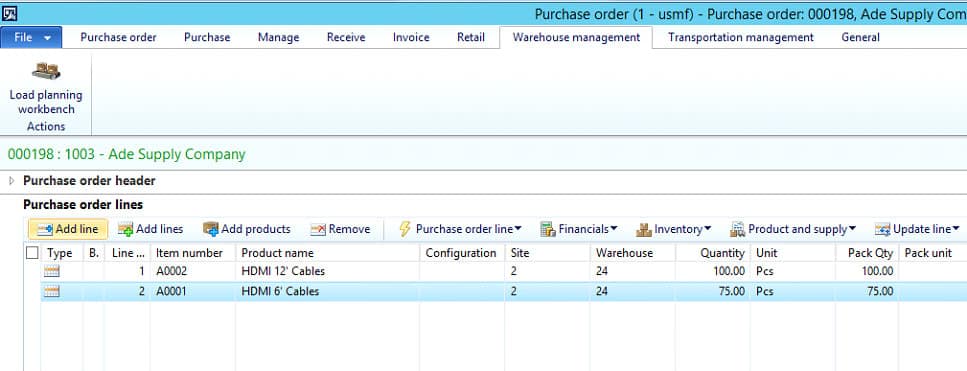
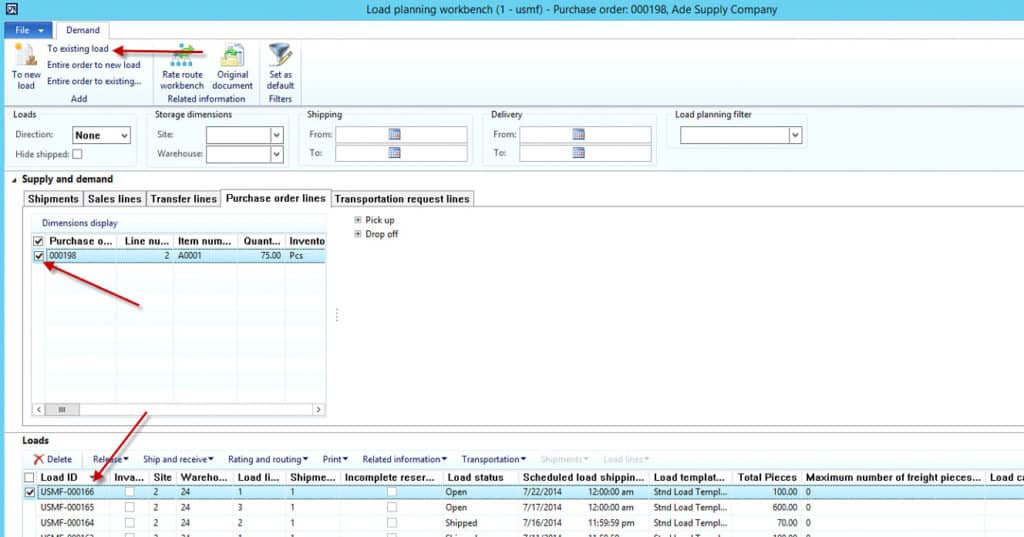
Once the line is added, click the Load planning workbench in the Warehouse Management ribbon bar. This will bring up the Load planning workbench once again, only now you will want to find your existing load in question and add the lines to an existing load.
*Note that if you need to identify which load you had previously created you can do this from the Line details on the PO.
If you look at existing loads from the WMS module instead of the Load planning workbench, you will get a different view. Find this at Warehouse Management -> Common -> Loads -> All loads. Please also note that there is a link here to the Shipment ID for the load line. We have not discussed shipments in detail in this blog post, but note that more information about statuses can be tracked via shipments. Shipments are automatically created with the creation of a load.
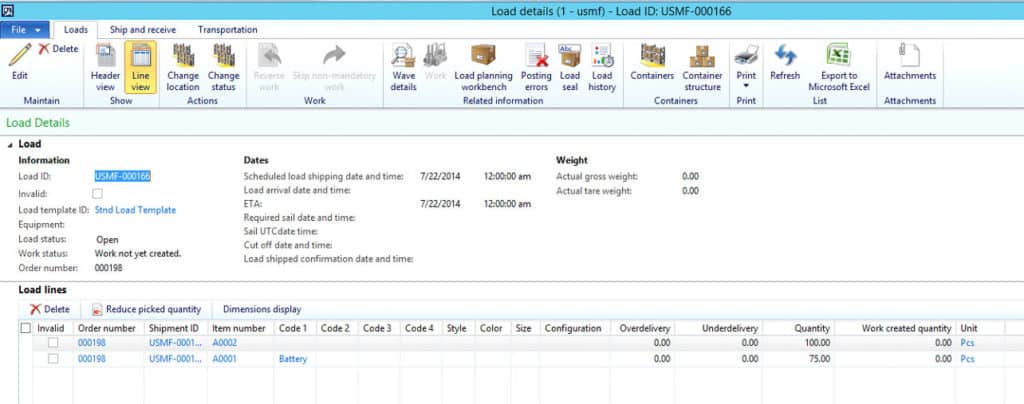
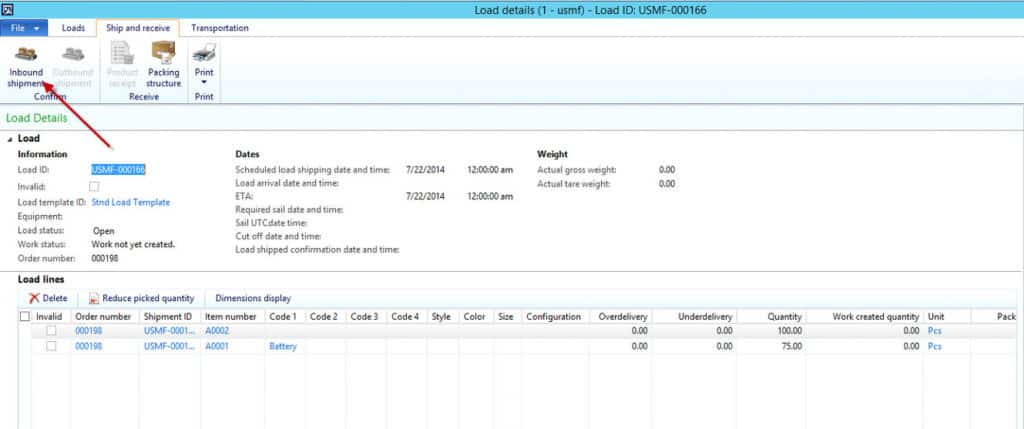
Once a load has been shipped the status on the load can be changed by Confirming the Inbound Shipment either from the Load Details or Load Planning Workbench screens. This will post your shipments and change the status of your load to Shipped. It also locks down the load from further changes – you will be prohibited from being able to change the load lines or dates once the load has been confirmed. In this case, we recommend using other methods such as Inventory Statuses to track your goods in transit. Posting the packing slip will also post your shipment and you can skip the Inbound Shipment Confirmation step altogether.
The Load Planning Workbench is integrated with new WMS and TMS functionality in Microsoft Dynamics AX 2012 R3. Purchasing departments using this tool will find it to be powerful and flexible for tracking inbound inventory. Warehouses wishing to use this for item receipt will need to have the advanced warehousing functionality enabled along with a number of other configurations in order to work properly. Stay tuned for future blog posts on AX 2012 R3 WMS systems, more warehouse solutions, and other functionality, including how to use the Load Planning Workbench with Sales Orders.
October 8th 2018 update
Avantiico has delivered many presentations at Dynamics user group events and webinars. If you want to learn more about how you can move from your current Microsoft Dynamics AX version to Microsoft Dynamics 365 take a look at the “How to upgrade to Microsoft 365” blog post.
If you have any questions about Microsoft Dynamics Support for Dynamics AX or Dynamics 365, Load Planning Workbench, Microsoft Product Lifecycle or if our AX specialists can help your team with information about Microsoft Dynamics 365 please contact our Microsoft Support team at DynamicsSupport@Avantiico.com. If your have ideas for Microsoft Dynamics blogs feel free to suggest topics of interests.
In the next 6 to 12 months you will see many Microsoft news so stay informed by following Avantiico on LinkedIn and YouTube:

Microsoft Dynamics 365 (D365) and SAP are two important contenders and are frequently compared during the selection cycle. Both platforms are very

In the following blog post, Erin Dominguez highlights new features coming to Power Platform in the 2022 Wave 1 Release. An Overview

The 2021 Wave 1 release for Dynamics 365 Supply Chain has introduced many new features that improve their software offerings that focus
600 B Street, Suite 300, San Diego, CA 92101 | (619) 483-4180 | info@avantiico.com
Discover how Avantiico helps you improve business processes, provide customers with a seamless experience and transform the way you do business.
Discover how Avantiico helps you improve business processes, provide customers with a seamless experience and transform the way you do business.